How to Protect Your Security Cameras From Winter Weather
Keep your surveillance working all season with expert tips on protecting security cameras from winter weather, condensation, and freezing temperatures.
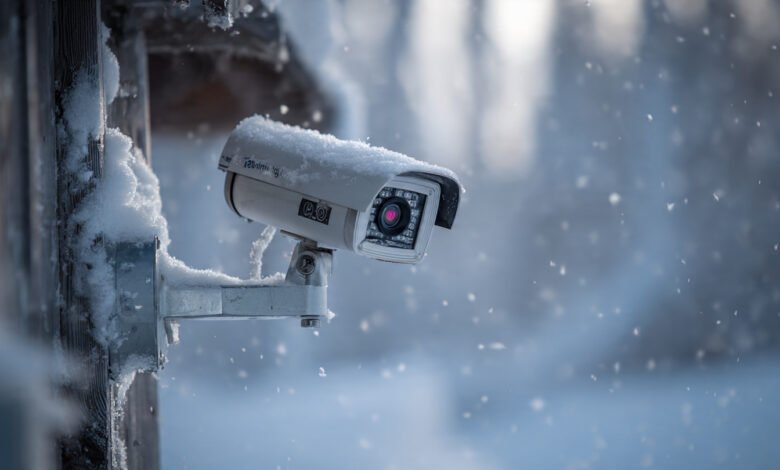
Winter brings more than just beautiful snowfall and cozy evenings. For homeowners and businesses relying on outdoor surveillance, the cold season presents real challenges that can compromise security systems when you need them most. Freezing temperatures, snow accumulation, ice formation, and moisture can all wreak havoc on your security cameras, leaving blind spots in your protection right when break-ins statistically increase.
The good news is that with proper preparation and the right knowledge, you can ensure your outdoor security cameras continue functioning reliably throughout the harshest winter conditions. Whether you’re dealing with occasional cold snaps or months of sub-zero temperatures, understanding how winter weather affects your surveillance equipment and taking proactive steps to protect it will save you from costly repairs, surveillance gaps, and the frustration of foggy or frozen footage.
This comprehensive guide will walk you through everything you need to know about protecting your security cameras from winter weather. You’ll learn how to choose the right cameras for cold climates, understand crucial weatherproofing ratings, prevent common winter problems like condensation and battery drain, and implement maintenance routines that keep your surveillance system operating at peak performance all season long. Let’s make sure your security cameras can handle whatever Mother Nature throws their way.
Understanding How Cold Weather Affects Security Cameras
Before you can properly protect security cameras during winter, it’s important to understand exactly what happens when temperatures drop and how various winter conditions impact different components of your surveillance system.
Operating Temperature Limits
Every security camera has a specified operating temperature range listed in its technical specifications. This range indicates the minimum and maximum temperatures where the camera can function reliably. Most quality outdoor cameras are designed to operate between -40°F to 140°F (-40°C to 60°C), but budget models may only handle temperatures down to 14°F (-10°C) or 32°F (0°C).
When temperatures drop below a camera’s minimum operating threshold, several problems can occur. Electronic components become sluggish, image sensors may produce grainy or discolored footage, and in extreme cases, the camera can stop functioning entirely until temperatures rise again.
Battery Life Reduction in Wireless Cameras
Cold weather significantly impacts battery life in wireless security cameras. Lithium-ion and other battery types undergo slower chemical reactions in freezing conditions, which dramatically reduces their capacity and runtime. A wireless camera that normally operates for two months on a single charge might need recharging every few weeks or even days in winter conditions.
This creates not just inconvenience but actual security gaps. If your wireless outdoor security cameras run out of power during the night, you lose surveillance coverage precisely when most property crimes occur.
Condensation and Frost Formation
One of the most common winter weather challenges is condensation forming on or inside camera lenses. When warm, moist air meets the cold surface of a camera lens, water vapor condenses into droplets. As temperatures drop below freezing, this moisture crystallizes into frost or ice that completely blocks the camera’s view.


Condensation typically worsens during temperature fluctuations. Morning dew that forms overnight freezes at dawn, creating the worst visibility problems during those critical early morning hours. Inside the camera housing, moisture accumulation can lead to internal condensation that fogs lenses from the inside and potentially causes short circuits in electronic components.
Mechanical Component Failures
Security cameras with moving parts face additional challenges in cold weather. Pan-tilt-zoom (PTZ) mechanisms can become sluggish or freeze entirely when lubricants thicken in low temperatures. Motors that normally move smoothly may struggle or fail, limiting your ability to adjust camera angles or zoom in on suspicious activity.
Even stationary cameras aren’t immune. Focus mechanisms, motorized IR filters, and other internal moving components can all be affected by extreme cold, leading to reduced functionality or complete failure.
Choosing Winter-Ready Security Cameras
The foundation of protecting security cameras from winter weather starts with selecting equipment designed to withstand harsh conditions. Not all cameras are created equal when it comes to cold weather performance.
Understanding IP Ratings for Weatherproofing
The IP rating (Ingress Protection rating) is your most important guide when selecting weatherproof security cameras. This two-digit code tells you exactly how well a camera resists dust and water intrusion.
The first digit (0-6) indicates dust protection, while the second digit (0-9) shows water resistance. For winter weather protection, you need cameras with at least an IP65 rating, though IP66 or IP67 ratings provide even better protection against blowing snow, ice melt, and water jets from any direction.
Here’s what these ratings mean:
- IP65: Complete dust protection and resistance to water jets from any direction
- IP66: Complete dust protection and resistance to powerful water jets (better for harsh winters)
- IP67: Complete dust protection and immersion resistance up to 1 meter (best for extreme snow and ice conditions)
According to the Consumer Electronics Association, proper IP ratings are essential for outdoor electronic devices exposed to environmental elements. Cameras without adequate ratings will eventually fail when moisture penetrates the housing.
Temperature Range Specifications
Always check the operating temperature specifications before purchasing cameras for cold weather use. Look for cameras that can handle at least -20°F (-29°C) if you live in regions with moderate winters. For areas with extreme cold, seek cameras rated down to -40°F (-40°C).
Quality manufacturers clearly list these specifications in their product documentation. If temperature ratings aren’t readily available, that’s often a red flag that the camera isn’t designed for serious outdoor use.
Heated Camera Systems
For the harshest winter environments, consider security cameras with built-in heating elements. These cameras include small heaters that maintain optimal operating temperatures inside the housing, preventing both component failures and internal condensation.
While heated cameras cost more upfront, they provide reliable year-round operation in extreme climates. Some models feature thermostatically-controlled heaters that activate only when temperatures drop below certain thresholds, conserving energy while ensuring protection.
Wired vs. Wireless Cameras for Winter
When choosing between wired and wireless security cameras for winter conditions, wired cameras have distinct advantages. They draw continuous power from your electrical system, eliminating battery life concerns entirely. The constant power flow also generates some heat that helps keep internal components warm.
Wireless outdoor security cameras offer installation flexibility but require more winter maintenance. If you choose wireless cameras, look for models with solar panel options or the largest battery capacities available. Some newer models use lithium iron phosphate (LiFePO4) batteries that perform better in cold weather than standard lithium-ion batteries.
Strategic Camera Placement for Winter Protection
Where you mount your security cameras significantly impacts their winter performance and longevity. Smart placement reduces direct exposure to harsh elements while maintaining necessary surveillance coverage.
Utilizing Natural Shelter
Mounting cameras under eaves, overhangs, or awnings provides crucial protection from snow accumulation and direct precipitation. Position cameras approximately 8-10 feet high under these structures to maintain a clear view while benefiting from the shelter.
Natural barriers like building corners or recessed areas can shield cameras from wind-driven snow and rain. Just ensure your placement doesn’t create blind spots in your coverage or make cameras easily accessible to potential tampering.
Avoiding Direct Sun Exposure in Winter
Winter sun sits lower in the sky and can create severe glare problems for security cameras, especially during sunrise and sunset. This low-angle sunlight often overwhelms camera sensors, washing out footage and making it difficult to identify faces or license plates.
When positioning cameras, consider the sun’s winter path and angle cameras slightly downward or to the side to minimize direct sun exposure. Many modern cameras feature auto-exposure technology that helps compensate for brightness changes, but proper positioning is still your first line of defense.
Wind Protection Considerations
Strong winter winds can shake improperly secured cameras, creating blurry footage and potentially loosening mounting hardware over time. Wind-driven snow and debris can also obstruct camera views or damage protective housings.
Install security cameras using heavy-duty mounting brackets and hardware rated for outdoor use. In particularly windy locations, consider adding wind deflectors or shields that redirect gusts away from the camera while maintaining an unobstructed view.
Minimizing Snow Accumulation Zones
Mount cameras in locations where snow is less likely to accumulate directly on the lens or housing. Areas protected by overhangs naturally shed snow better than completely exposed locations. Angle cameras slightly downward so snow and ice slide off rather than building up on the lens surface.
Avoid mounting cameras directly above doorways or high-traffic areas where snow falling from the housing could create hazards or where people might accidentally bump and misalign the camera.
Essential Winter Maintenance for Security Cameras
Regular maintenance is crucial for keeping outdoor security cameras functioning properly throughout winter. Unlike other seasons, winter demands more frequent attention to prevent problems before they compromise your security.
Regular Lens Cleaning
Snow and ice on camera lenses is the most common winter problem. Establish a routine of checking and clearing lenses at least weekly, or daily during active snowfall. Use a soft microfiber cloth to gently wipe lenses, removing moisture, frost, and accumulated snow.
Never use hot water to melt ice on a cold camera lens, as the sudden temperature change can crack the lens or housing. Instead, allow the camera to warm gradually, or use a hair dryer on a low, warm (not hot) setting from a safe distance.
Inspecting Housing Seals
The weatherproof seals on camera housing units deteriorate over time, especially when exposed to freeze-thaw cycles. Before winter arrives, carefully inspect all housing seals for cracks, gaps, or brittleness. Replace any compromised seals immediately.
Check that housing covers seal tightly and that no moisture can enter through cable entry points. Even cameras with high IP ratings can develop leaks if seals fail, allowing moisture inside where it causes fog, frost, and potential short circuits.
Cable and Connector Protection
Cables and connectors often get overlooked during winter preparation, but they’re vulnerable to damage from cold, moisture, and physical stress. Inspect all outdoor cables for cracking, brittleness, or exposed wiring. Use weatherproof junction boxes to protect connection points from snow and ice.
For cables running along exterior walls, use conduit to provide additional protection from the elements and physical damage. Ensure all holes where cables penetrate walls are sealed with waterproof materials like silicone caulk to prevent moisture infiltration.
Preventing Internal Condensation
Condensation inside security cameras causes more damage than external frost. To prevent internal moisture, place silica gel packets inside camera housings if your model allows access. These desiccant packets absorb excess moisture from the air, reducing condensation formation.
When servicing cameras, avoid moving them directly from extreme cold to warm indoor environments. Allow cameras to warm gradually to room temperature before opening housings, preventing condensation from forming due to rapid temperature changes.
Checking Power Supplies
Cold weather can affect power supplies and surge protectors. Verify that all power connections remain secure and that outdoor power supplies maintain stable voltage. For wireless cameras, check battery levels more frequently than during warmer months and keep spare batteries charged and ready.
If you notice cameras rebooting randomly or experiencing power fluctuations, investigate the power supply immediately. Many winter camera failures stem from power issues rather than the cameras themselves.
Advanced Winter Protection Techniques
Beyond basic maintenance, several advanced techniques can significantly improve your security camera winter performance, especially in regions with severe winters.
Anti-Fog and Anti-Frost Coatings
Specialized hydrophobic coatings repel water and prevent fog formation on camera lenses. Products like anti-fog spray or film create an invisible barrier that causes water droplets to bead up and roll off rather than forming a vision-obscuring film.
Apply these coatings according to manufacturer instructions before winter begins. Some coatings last several months, while others require monthly reapplication. Always verify that coating products are safe for camera lenses and won’t damage protective glass or plastic covers.
Camera Housing Heaters
For cameras without built-in heating, aftermarket housing heaters provide an effective solution. These small, low-wattage devices mount inside camera housings to maintain temperatures above freezing, preventing both condensation and component failures.
Choose heaters specifically designed for security camera applications with thermostatic controls that activate only when needed. Proper sizing is important—too much heat can damage camera components, while insufficient heating won’t prevent freezing.
Silica Gel Desiccants
Beyond simple maintenance, strategic use of silica gel packets inside camera housings provides ongoing moisture control. Replace these packets every few months, as they become saturated with absorbed water over time.
Indicating silica gel that changes color when saturated helps you know when replacement is needed. This simple addition can dramatically reduce internal condensation problems that fog lenses and damage electronics.
Ventilation Considerations
While sealing cameras against moisture is important, some ventilation prevents humidity buildup inside housings. Many professional camera housings include small breather valves that allow air exchange while blocking water intrusion.
If adding heaters to camera housings, ensure adequate ventilation to prevent heat buildup that could damage sensitive components. Balance between moisture protection and preventing overheating requires careful attention to housing design.
Addressing Common Winter Camera Problems
Even with proper preparation, winter can create specific problems requiring targeted solutions. Understanding these issues helps you respond quickly when they occur.
Dealing with Persistent Fog and Frost
If your camera lens repeatedly fogs despite preventive measures, you may have a seal failure allowing moisture inside the housing. Remove the camera, thoroughly dry all internal components, check and replace seals, and add fresh desiccant before reinstalling.
For external frost that forms overnight, consider repositioning the camera to a location that receives early morning sun, allowing natural warming to clear frost before peak viewing hours. Alternatively, a small heating pad on a timer can prevent overnight frost formation without running constantly.
Battery Drain Solutions
When wireless security cameras drain batteries too quickly in cold weather, you have several options. Bring removable battery packs indoors overnight to keep them warm, or invest in solar panel charging systems that maintain battery levels during daytime.
Some users successfully wrap battery compartments with insulation (ensuring no ventilation blockage) to reduce heat loss. For critical locations, consider switching to wired cameras that eliminate battery concerns entirely.
Sun Glare Management
Low winter sun creates challenging lighting conditions. Use cameras with wide dynamic range (WDR) or backlight compensation features that balance bright and dark areas in the same frame. Adjust camera angles seasonally to account for the sun’s changing position.
Physical sunshades can help, but ensure they don’t collect snow or create new obstruction problems. Some installers use adjustable mounting brackets that allow seasonal angle changes without complete reinstallation.
Ice Accumulation on Dome Cameras
Dome cameras are particularly vulnerable to ice buildup on their clear protective covers. Once ice forms, it’s difficult to remove without risking damage to the dome surface. Prevention is key—apply hydrophobic coatings that prevent ice adhesion, or use heated dome housings designed for cold climates.
If ice does form, allow it to melt naturally rather than attempting physical removal. Heated air from a hair dryer (never hot water) can accelerate melting if necessary.
Winter-Specific Camera Features to Consider
When upgrading or purchasing new security cameras for winter use, certain features provide significant advantages in cold weather conditions.
Infrared Night Vision Performance
Winter’s shorter days mean cameras rely more heavily on infrared (IR) night vision. Quality IR LEDs maintain performance in cold weather, but some cheaper models experience reduced range or clarity at low temperatures.
Test night vision performance during the coldest weather to verify it meets your needs. Consider cameras with adjustable IR intensity to prevent whiteout when snow reflects IR light back to the camera.
Smart Motion Detection
Advanced motion detection that distinguishes between humans, vehicles, and environmental movement (like blowing snow or branches) reduces false alerts during winter weather. AI-powered detection helps maintain useful notifications while filtering out snow-triggered events.
This feature becomes especially valuable when cameras are positioned where snow or wind might trigger constant alerts from basic motion sensors.
Remote Zoom and Focus
Security cameras with remote zoom and focus adjustment allow you to compensate for changing conditions without physically accessing the camera. This capability proves invaluable when cameras are mounted in difficult-to-reach locations or when you need to adjust viewing angles during storms.
Two-Way Audio
Two-way audio isn’t just for communication—it can help verify camera operation during severe weather. If you suspect a camera isn’t capturing audio properly, you can test it remotely rather than venturing outside in harsh conditions.
Long-Term Winter Readiness Planning
Successful winter weather protection isn’t just about reacting to problems—it’s about creating sustainable systems that maintain security through multiple winter seasons.
Pre-Season Inspection Checklist
Before temperatures drop, conduct thorough inspections of your entire surveillance system. Create a checklist that includes:
- Verifying all camera operating temperatures match local winter lows
- Testing power supplies and backup systems
- Inspecting and replacing weatherproof seals
- Cleaning lenses and applying protective coatings
- Checking cable connections and protective conduits
- Confirming camera angles and coverage areas
- Testing night vision and IR performance
- Verifying remote access and monitoring systems
Upgrading Inadequate Equipment
If your current security cameras consistently underperform in winter, consider upgrading before another season arrives. Cameras without adequate IP ratings (below IP65), battery-powered systems in cold climates, and cameras experiencing frequent fog or frost issues all signal the need for better equipment.
According to the Electronic Security Association, investing in proper weatherproof equipment costs less than repeatedly repairing or replacing inadequate systems while dealing with security gaps.
Professional Assessment Options
For complex installations or persistent problems, professional security system assessments can identify issues you might miss. Experienced installers understand local climate challenges and can recommend specific solutions for your situation.
Many security companies offer seasonal maintenance contracts that include pre-winter inspections, cleaning, testing, and necessary repairs. This proactive approach prevents problems rather than reacting after failures occur.
Conclusion
Protecting your security cameras from winter weather requires understanding how cold temperatures, moisture, and harsh conditions affect surveillance equipment, then taking proactive steps to prevent problems before they compromise your property’s protection. By choosing cameras with appropriate IP ratings and operating temperature ranges, strategically positioning them to minimize exposure while maintaining coverage, implementing regular winter maintenance routines, and utilizing advanced protection techniques like anti-fog coatings and housing heaters, you can ensure reliable year-round surveillance. Remember that proper winter preparation isn’t just about protecting expensive equipment—it’s about maintaining the safety and security of your property and loved ones during the season when functional surveillance matters most. With the strategies outlined in this guide, your security cameras will continue delivering clear, reliable footage no matter what winter weather brings.