How to instal a new computer or laptop

It’s a fun moment right now. You recently purchased (or received) a brand-new computer or laptop to replace the old one you had been using.
Although you might be tempted to use it right away, refrain because doing so could leave you vulnerable to spyware and viruses and prevent you from utilising some of your favourite programmes.
Even though it may be annoying, setting up your laptop, desktop computer, or even tablet properly is worth the time it takes. You’ll avoid a lot of headache in the future and ensure that all of your crucial data is kept safe and secure.
With instructions for both Windows 10 and Windows 11, this guide focuses on Windows. The procedure on Apple’s macOS is a little bit different; for a thorough guide, visit our sister site Macworld.
Step 1: Turn on the power
You can’t do anything without turning on your smartphone, which seems so apparent.
The power button is usually always denoted by a little vertical line inside of a circle, but the location varies from model to model. The most frequent location on laptops is in the top-right corner of the keyboard, whereas on desktops it can be either the front or the rear of the monitor or computer case.
You’ll then need to go through the first setup procedure after that is taken care of.
Selecting your area and language, accepting the licence conditions, customising the colour scheme, naming your PC, selecting a Wi-Fi network, deciding whether to accept the so-called “express settings” or customising, and logging into your Microsoft account are all required steps for Windows 10.
On Windows 11, the procedure is more simplified; all that is needed are the region, language, Wi-Fi, and privacy settings. It should be quite simple if you just follow the instructions on the screen. It’s simple to say no when offered an Xbox Game Pass subscription.


On Windows 11 or 10, you can technically still instal Windows without a Microsoft account, but doing so is not advised. You won’t have access to things like OneDrive cloud storage, the Microsoft Store, and the built-in Mail app.
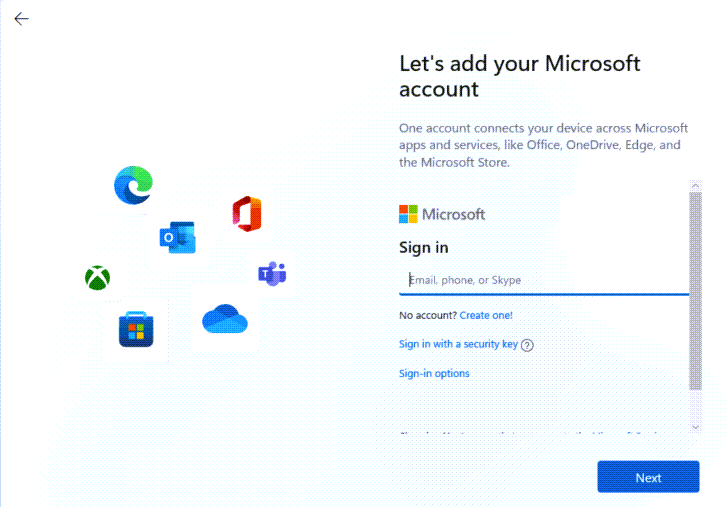
However, even if you choose not to use OneDrive, using a cloud storage service is still preferable to relying solely on local data.
Step 2: Dispose of bloatware
Most likely, your new computer will be pre-loaded with a variety of unwanted software. Some of it might only be helpful, but for the majority of users, the term “bloatware” fits well because these trial programmes take up space on your hard drive and may cause your PC to run slower.
Open the Start menu by clicking the Windows logo in the bottom left corner, then select the cog symbol to access Settings to check what is already installed on Windows 10. To find a list of all the programmes you have installed on your device, go from there to System > Apps. You might be surprised by how much there is given that you have only recently set it up.

Click “Uninstall” after selecting any software you’re certain you no longer want. It might do the removal automatically or start a wizard to give you that option. Repeat for each app you want to uninstall.
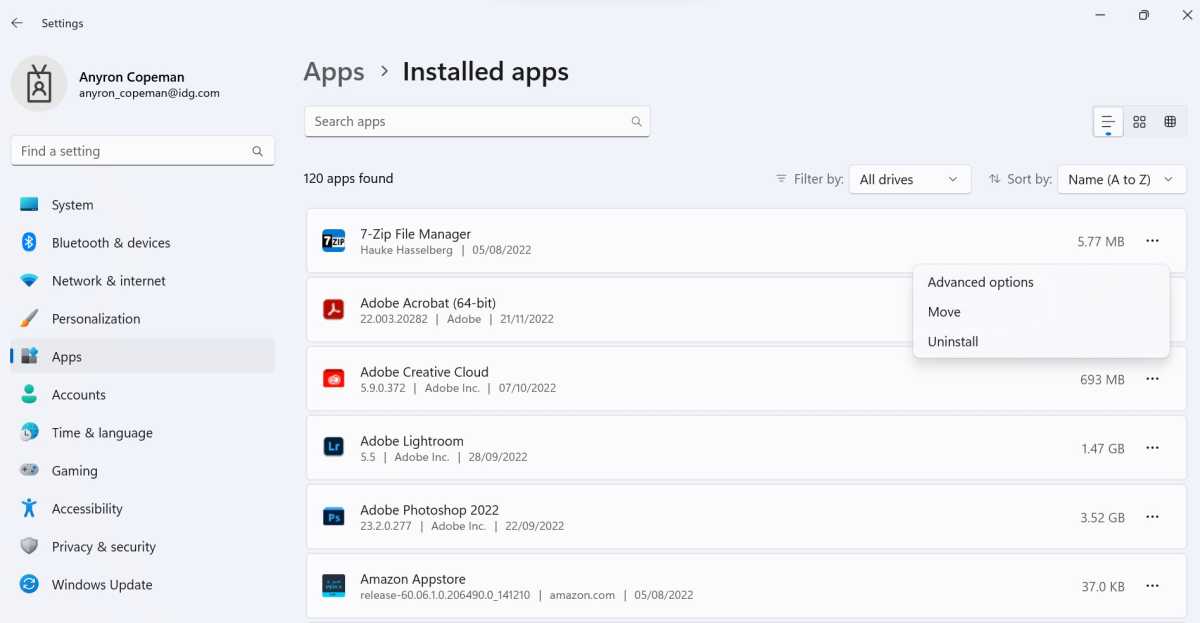
Windows 11 makes the procedure a little bit easier. Open Settings by selecting it from the Start menu or by doing a search, then select Apps > Installed Apps. Click the three dots next to any item whose listed size you want to eliminate, then select “Uninstall.”
However, the best course of action is to leave whatever you’re unsure of while you look into what it’s genuine purpose is. Most stuff pertaining to the processors or manufacturer of your device should be left alone, however antivirus software can be securely deleted (given you’re replacing it with another one).
Read More:Leverage Blockchain Technology for Your Business
Step 3: Install several applications at once
Perhaps you already know which initial apps you’ll want to download, but what if you could download the majority of the essential ones at once?
For Windows 10 and 11, the app Ninite provides that and is cost-free. Simply visit the Ninite website and check the boxes next to the apps you want to download; my recommendations are Chrome, Dropbox, Zoom, Spotify, Audacity, and Malwarebytes.
An individual installer will then be downloaded for you when you just click “Get Your Ninite” at the bottom of the page. All of these apps will be upgraded to the most recent version if they are already installed. This makes it simple to make sure that important programmes are constantly updated.
Despite how convenient it could be, resist the urge to choose items that you won’t likely utilise. After all, it doesn’t make much sense to remove bloatware from your new PC just to download a tonne of undesirable software.
Step 4: Install each app separately
However, if you have pricey software that you routinely use and purchased for your previous computer, you’ll probably want it on your new laptop. Ninite may be helpful for installing a good range of utilities and free applications.
Here, we’re not referring to freely accessible, anytime-downloadable programmes that are generally available for free. Nowadays, whether it’s Microsoft 365 or Adobe Creative Cloud, the majority of users use programmes like Microsoft Word or Adobe Photoshop via a subscription.
Microsoft Office products, however, frequently release new standalone versions, whereas previous Adobe apps may be obtained without a subscription. If you’re not limited to one device, your current licences should allow you to instal it on your new computer, but what if you can’t log in or have forgotten your licence key?
There are other alternatives to contacting the app’s maker’s customer service teams, however it is still worthwhile to do so. Free tools Magical Jellybean and Belarc Advisor can extract the licence key from many (but not all) well-known products. Before attempting to reinstall the programme on your new device, use the application to find the required keys on your old device.
If everything else fails, it’s worthwhile to take a look at the cost-free alternatives to well-known apps. Word processors LibreOffice and Google Docs perform well, while GIMP or the web-based Pixlr E perform well for basic photo editing.
Step 5: Adjust parameters.
There are numerous customization possibilities, but it’s important to set up some right away.
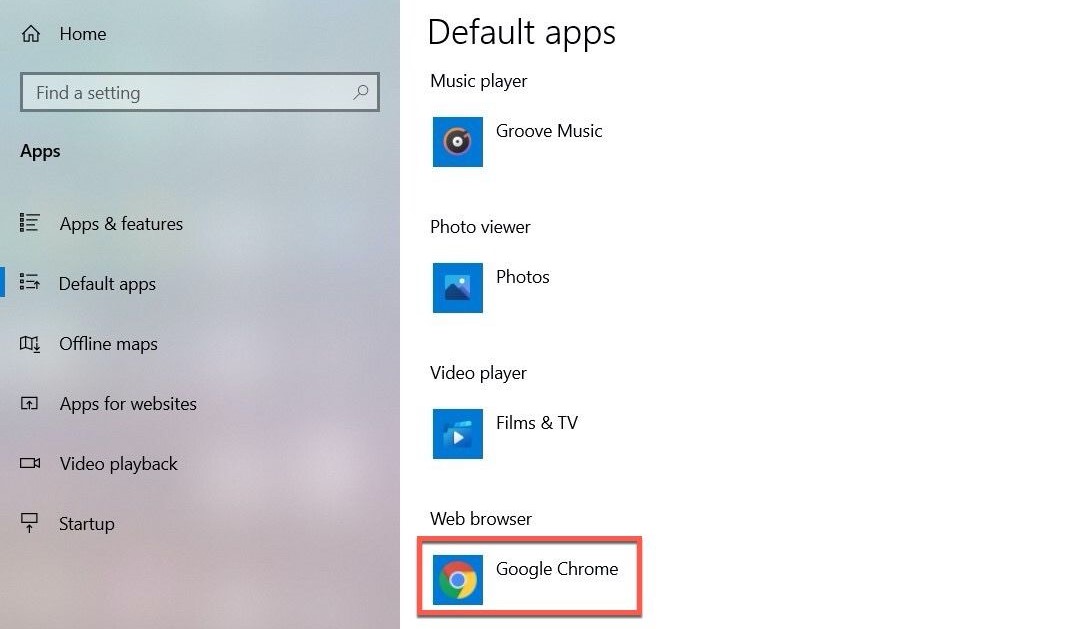
The default apps that launch when you click a link, play music, browse images, or access your emails are one example. The default settings for Mail, Media Player, Photos, and other programmes can all be modified if you don’t like them.
Go to Settings > Apps > Default apps on Windows 10. Any category’s default selection should be clicked before selecting an alternative. The default Microsoft Edge browser is replaced with Google Chrome in the example below, which is a change that many users will want to make.
Things function a little differently on Windows 11. Here, you can select a default for a certain file type or select settings for individual apps. To make your selections, go to Settings > Apps > Default apps.
However, when it comes to Windows customization, that is merely the top of the iceberg. In Windows 10 and 11, navigate to Settings > Personalization and choose what you prefer.
Read More: 8 Crucial Ways Technology Has Redefined Businesses
Step 6: Copy files from your previous device.
Your numerous documents, music, videos, and images from your previous computer will undoubtedly need to be transferred. OneDrive, Microsoft’s cloud storage platform that is immediately incorporated into Windows 10 and 11 is the most convenient way to achieve that.
Once you’ve backed everything up to OneDrive on your old computer, all you have to do is sign in with your account information to download the data to your new laptop or PC. You can find a comprehensive guide to this on the Microsoft website.
Although it may seem alluring to copy everything to your new device, this is not the best course of action because you might be able to clear some clutter. Use this as a chance to undertake a thorough spring cleaning and get rid of any files you don’t need any longer. Even though you hardly ever need to copy anything over, don’t overlook the Downloads folder.
Step 7: Develop a backup plan.
It would be a nightmare if all the time you invested into setting up your new computer exactly how you want it to be lost. Making an image of your disc drive on an external storage device that you can use to restore it later is the key to making sure that never happens.
Control Panel, a historical programme that is still accessible on Windows 10 and 11, can be used to accomplish this. Open it, then select “Backup and Restore (Windows 7)” from the list of options under “System and Security.”
Select the attached storage device as the destination, then click “Set up backup” and follow the on-screen directions.
As an alternative, you could employ a third-party programme like AOMEI Backupper. Even more powerful Acronis Cyber Protect Home Office costs $49.99/£34.99 annually.
To ensure you get a dependable portable hard drive, check out the top models available.
However, rather than taking the place of the backup choices in Settings, this should be used in addition to them. Go to Update & Security > Backup on the Windows 10 app and make sure “Automatically back up files” is set on. Learn more about backing up Windows 10 in our separate guide.
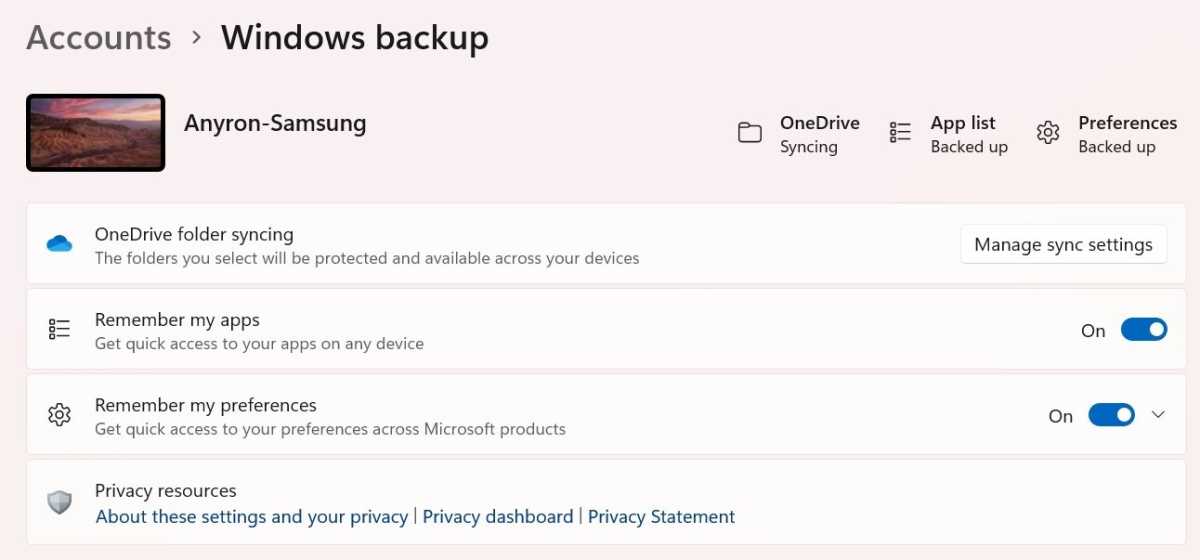
Go to Accounts > Windows backup in Windows 11 and select “Manage sync settings” next to “OneDrive folder syncing.”
I’m done now! Your computer or laptop is now ready for use. Although it may seem like a lengthy process, it only needs to be completed once and is worth it.


One Comment